Making a presentation is a necessary part of our daily work and life and a required skill for laborers and students. It helps us to show our products and ideas visually. However, in recent years, an excellent presentation is not for the eyes only. Instead, it is for both eyes and ears.
In this article, we will show you how to add Amazon music to Google slides for presentation. As is known to all, we cannot own Amazon music files in a real sense due to encryption, not to mention adding them to documents or slides. But don't worry. With this passage, you can easily do it.
Part 1. Add Amazon Music to Google Slides via Link
Different from PowerPoint slides, Google slides offers a link insertion option for its users. That is to say, you are allowed to insert Amazon music links to your Google slides. How to do that? Read on.
Step 1 Open your Google slides.
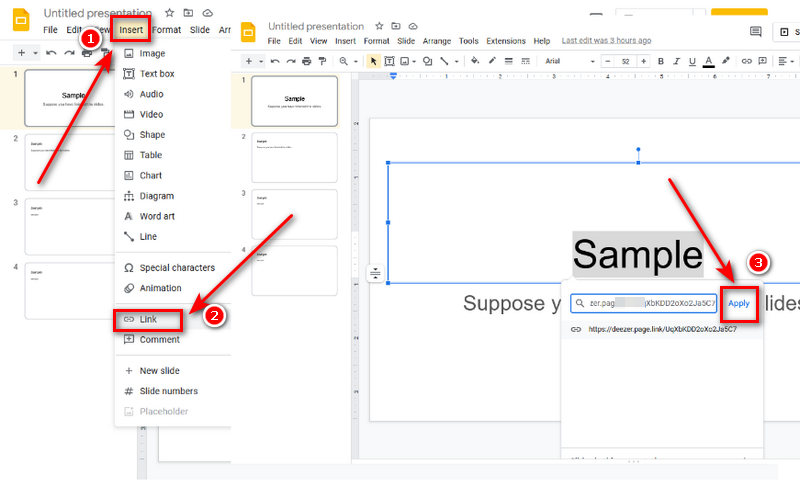
Step 2 Select the content that you want to add a link, words, or image.
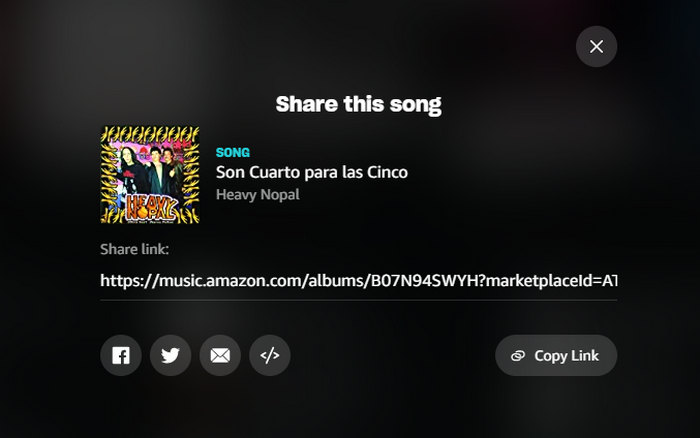
Step 3 Open Amazon Music, and find a song. Click the three dots to select Share this song to copy the URL.
Step 4 Back to the slides, enter the URL, and click Apply.
When presenting, click the link. Amazon Music web will open, and you can see the related album or playlist, then play the song.
This is the easiest way to add Amazon music to Google slides. However, your audience is easily disrupted by non-presented content. It needs time to open a new page and find the specific song. If your account is not logged in, you need to spend time doing that too. All of them greatly reduce the presentation consistency. So in the next part, we are going to introduce you to a perfect way to add Amazon music to Google slides.
Part 2. Add Amazon Music to Google Slides with TuneBoto
In this part, you will learn the top way to add or import Amazon music to your Google slides. In general, you need to do two things, download Amazon music to your local computer and insert it into your Google slides. Let's read the following carefully.
Part 2.1 Download Amazon Music to Local Computer
To download Amazon music to a computer, you are required is to use the tool TuneBoto Amazon Music Converter. This well-crafted program can download Amazon Prime & Unlimited music to the local computer and convert them to MP3, AAC, WAV, AIFF, ALAC, and FALC with ID3 tags preserved. Read on to learn how to use the tool.
Amazon Music Converter
-
Download Amazon Music songs, albums, playlists & podcasts to local computer
-
Convert Amazon Music songs to MP3, AAC, WAV, FLAC, AIFF, ALAC
-
Keep ID3 tags; 100% original audio quality
-
10X download speed & batch download playlists/albums
-
Archive downloaded songs by album/artist
Step 1 Launch TuneBoto Amazon Music Converter
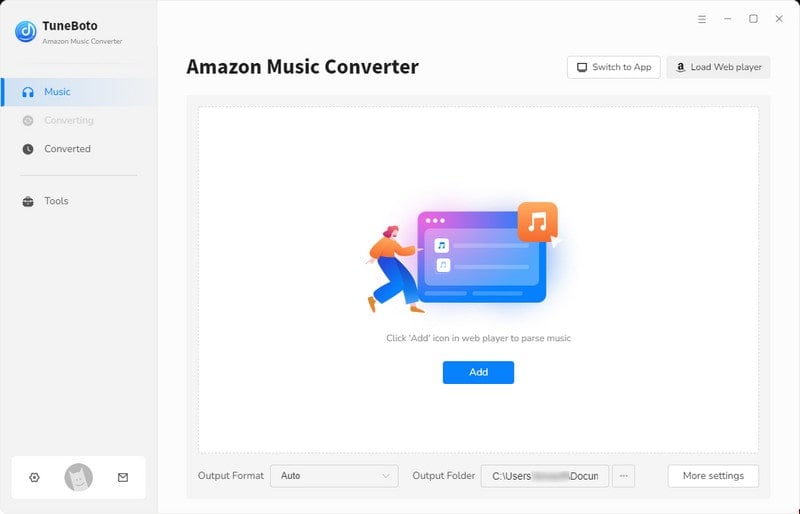
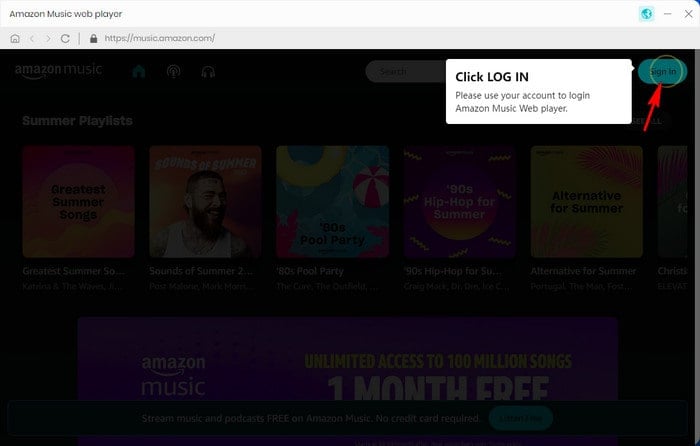
The first thing you need to do is to launch the TuneBoto program on your computer. If you have never used the program before, then click the button above to download and install the correct version on your computer. Click the button "Open Amazon Music Web Player" in the middle of the screen. Next, you will see the official Amazon music web, that's it. Follow the instructions to sign in to your account.
Step 2 Adjust Output Settings on TuneBoto
To make the Amazon music output in the manner you wish, click the "Settings" button after successful sign-in. On the popup panel, select an output format, bit rate, sample rate, and output folder, where the output files will lie. Then select options of the output file name and choose how the output files are sorted by Output Organized. Then close the window to apply all the parameters.

Step 3 Download Amazon Songs/Playlists/Albums/Podcast
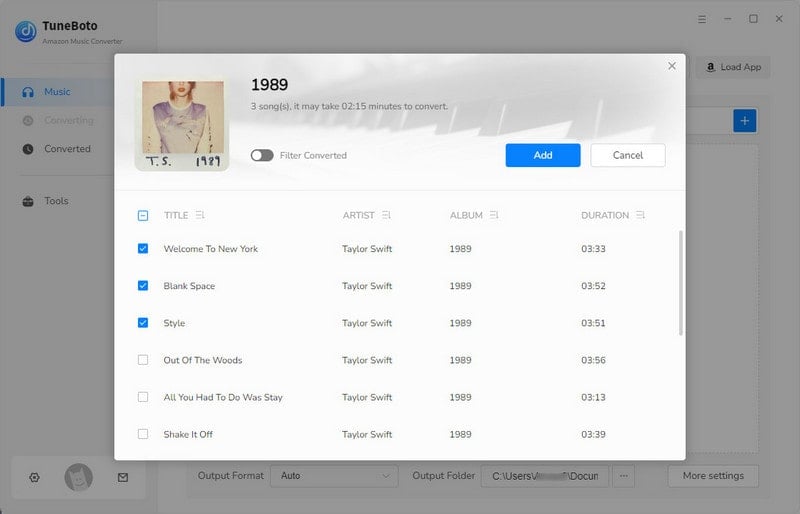
In this step, find the Amazon songs, playlists, albums, or podcasts that you want to download. Click the cover to open it if necessary. Hit on the blue "Add+" icon to open a panel. All the available songs are listed on the panel. Pick the concrete tracks and click "Convert Now" to start the conversion at once. The progress won't take too long, as TuneBoto proceeds up to 10X, faster than other any tools.
Step 4 Check the Output Amazon Files
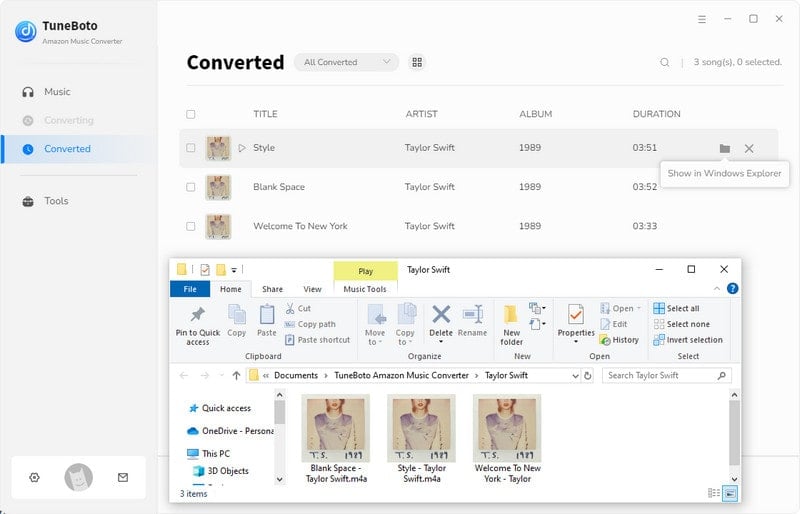
Once the conversion is finished, the output folder will occur by itself. There you can check the downloaded Amazon music. You can also click the "History" icon on TuneBoto to check your download record. Click the folder icon, you can check the output audio files too.
Part 2.2 Add Amazon Music to Google Slides
Having successfully downloaded Amazon music to your computer with TuneBoto and gotten audio files, it is time to insert the files into your Google slides. Follow the steps below.
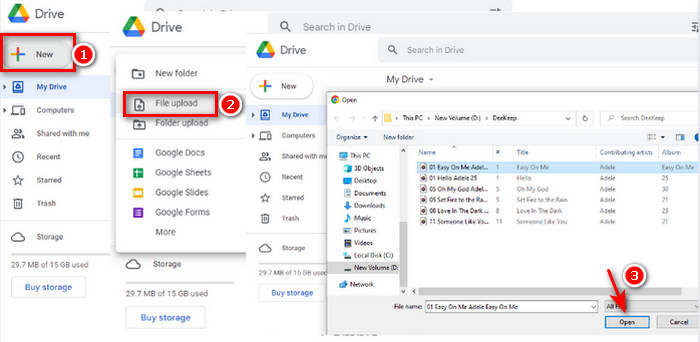
Step 1 Open your Google and go to Google Drive.
Step 2 Click the + New icon and select File upload.
Step 3 Navigate to the downloaded Amazon music and select a song, and click Open to upload.
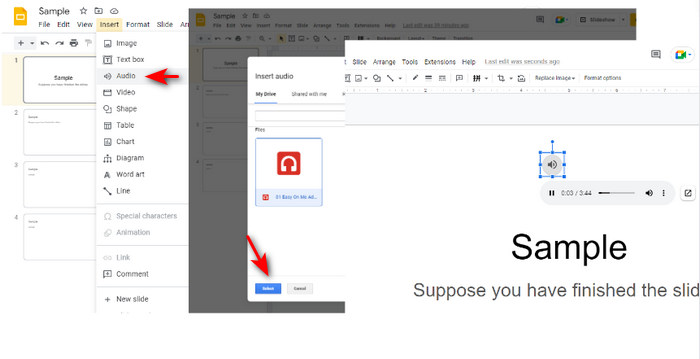
Step 4 Go to your Google slides, and click Insert in the menu bar.
Step 5 Select Audio, choose an Amazon song and click on Select.
A speaker will then occur on the slide. Click it, the Amazon song will play.
Summary
Above are the two ways to add Amazon music to Google Slides. You can add via a link. But using TuneBoto Amazon Music Converter is strongly recommended. With this tool, Amazon music is downloaded and converted to common audio files, making it convenient to insert Amazon music into your Google slides. TuneBoto Amazon Music Converter helps you more than you think. So do not hesitate to download the tool.


